
🎙 On the go? Listen to the article through our podcast, Cave Bits!
Listen to more episodes of Cave Bits
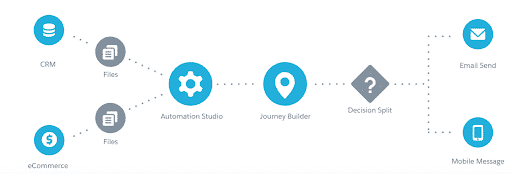
Winning over customers who convert is getting more and more difficult, considering the competitive marketplace and easy access to services. Therefore, marketers invest in analytics tools like Mouseflow to understand how users actually interact with their website content. They also look to their CRM tools, like Salesforce, to contextualize the user’s journeys to their deal progress.
Mouseflow allows you to identify UX issues via visitor session recordings and understand costly friction points throughout the on-site buyer’s journey. According to these insights, you can take action and increase the likelihood of conversions. Once you have all the necessary customer information from Mouseflow, you can guide customers on personalized journeys across the diverse channels and employ multi-channel marketing campaigns with the help of Salesforce Journey Builder (or other integrated CRMs).
But getting the most value from Salesforce Marketing Cloud Journey Builder takes a careful, targeted approach.
Here’s how to maximize your SFMC Journey Builder’s effectiveness.
Enter Salesforce Marketing Cloud Journey Builder⏎
As simple as it sounds, it can get quite tricky if you are not familiar with the SFMC Journey Builder best practices.
So, to streamline things for you, we are here with some best practices that you must follow while using Journey Builder.
1. Start by asking yourself three fundamental questions.
Before configuring the journeys, ask yourself:
- Is the journey serving any purpose?
- Will customers care?
iii. How will customers be able to act on it?
- If you get more than one purpose in the first answer, you must split the journey.
- There is no need to create the journey if the answer to the second question is “No”.
- In case you have no answer for the third one, you will not be able to configure the send times and channels.
2. Divide the journey into sections or modules.
More often than not, the buyer’s’ journeys are lengthy and complex. Hence, you should divide the journey into smaller sections or modules so that they are easier to test and update.
Modular journeys are easier to present on the canvas without getting overwhelmed. You can also reuse these modules. Always remember the rules from Zen of Python: “Simple is better than complex. Complex is better than complicated”.
3. Use wait activities only if necessary.
When you want to hold a contact according to different attributes or events, you must use wait activities. As the contacts wait for the next step, they will be saved in the database. This can lead to additional processing overhead for the journey.
Apparently, wait activities look pretty simple to execute but remember that: Wait activities should not be included at the beginning of the journey or simply to display the contact count. Refrain from using activities that are less than 5 minutes long.
4. Pay special attention to segmenting the data.
Rather than using filter criteria within the journey, you must try to prepare and segment the data before they enter the journey. The journey processing speed depends on the complexity of the filter criteria used in the decision splits and in the entry source.
While you set up the filters, use journey data instead of contact data. Also, ensure that all the attributes that you use are a part of the entry event data. As far as possible, use exact matches (=) instead of ‘ends with’ and ‘contains’. This will help to use the computing resources judiciously.
5. Filter out the unnecessary contacts.
Although you will be able to use domain exclusion and exclusion scripts in the journey, it will slow down the processing according to the number of contacts in the journey. It is, therefore, a good idea to use automations and filter out the contacts that you do not need, before their entry in the journey.
6. Determine how to measure the effectiveness of the journey.
Salesforce Journey Builder will give you insight into the position of users in the journey. Beyond that, you will also have to evaluate how they proceed in the journey. Remember that you might have to capture the attributes in a Data Extension when a prospect or customer moves along different paths. When you design the journey, make sure you have a clear idea about all these aspects. The performance of the journey will heavily rely on the extent of AMPScript used in the emails or messages.
7. Keep optimizing your content.
While an infographic might work well for one business, whitepapers might work for another. There is no doubt that high quality content will help to facilitate the decision making process and drive instant conversions.
So, you must keep track of the engagement and see what kind of content works the best for your business. In case it fails to bring the desired results, you must optimize it and try to make it impactful enough to bring the conversion.
8. Focus on security and create safety nets.
It comes as no surprise to have a competitor in your Salesforce journey every now and then. Hence, you must create safety nets and data checking around the entry point. Furthermore, you must set definite rules to deal with new leads, new customers, and repeat clients entering the journey.
9. Try to impart an inclusive experience to the readers.
Many marketers think that they can just translate the English-language journey and use it for other countries. That is a huge mistake. Instead, it is advisable to take the help of a native speaker to review the content so that it is well aligned to the traditional values and linguistics of the country.
Content links should redirect to in-language websites and content. This also includes collection forms and auto-responders.
Furthermore, if you have added customer service links in the footer, make sure they redirect to the in-country customer service page.
Send-time optimization is another important aspect to be considered while scheduling the emails. For example: If you are sending an email to someone in Melbourne, consider the Australian time zone. Avoid sending emails during the weekend or outside of business hours.
Marketers must also be familiar with the data privacy laws and anti-spam guidelines that apply to the country.
Creating separate journeys for every geographical location comes with several other benefits, as discussed below:
- You will be able to optimize the processing time and efficiency for entering different audiences into journeys and syncing journey activities with other Salesforce solutions and third party applications.
- It will give you an opportunity to get detailed reports on each audience and compare results based on different geographical locations.
- As you have optimized the marketing communications for different geographies, you will be able to expect better results from the campaigns.
10. Validate and test your journey.
Validate and Test are two important features in the journey builder. Validating allows you to recognize the broken links and the mistakes that you might have skipped. It gives you the confirmation that the journey’s components have been configured properly and work as expected.
Testing the journey means configuring a test journey with real contacts. It will give you a clear picture about the path that a prospect or customer will follow in the journey according to their buyer persona. You will be able to ascertain whether the contact will receive the correct communication before launching the journey.
Wrapping Up
Most marketers using Journey Builder struggle to coordinate different features and functionalities with optimal cohesion. These tips will surely help you to use the insights gathered through tools like Mouseflow to its maximum potential by further contextualizing them in Journey Builder.

Source: Journey Builder Best Practices