Consumers are are turning to online retail to make every day purchases now more than ever. But, as these behaviors evolve, so does the competition and eCommerce businesses who continue to be agile and make decisions based on real consumer behavior data will always outperform those who don’t.
First, it’s important to understand where visitors are struggling on your site and where they are experiencing friction. All of which you can do using Mouseflow of course.
In this article, we’ll walk you through how to track shopping cart value by injecting it into a Mouseflow recording variable, so you can measure the value of both conversions and the potential loss of sales and remedy the issues costing you revenue.
Process overview
Here’s what we’ll cover.
- Configure a GTM value to pick up the basket value (shopping cart value).
- Configure a GTM tag and trigger when the basket (shopping cart) page is viewed
- Configure the “Check-out Funnel Report” within Mouseflow
Result:
Tracking the basket value can be useful within Funnel Reports to understand the value of potentially lost conversions. If you are also tracking campaign codes like UTM’s, GCLID’s, and CID’s, you are also able to understand the value of both won and lost conversions per campaign.
Configure a GTM value to pick up the shopping cart value
Start by adding some products to your cart, then visit the cart/basket page. Using the browser console you can access the GTM DataLayer and understand how to crawl to fetch the “total price” element within the basket/cart page. You can enter the following command to crawl up the hierarchy and identify the “total price” container.
TIP: Depending on your webpage structure you can add one or more “parentElement” sections to crawl upwards.
google_tag_manager["YOUR OWN GTM-CODE"].dataLayer.get("gtm.element").parentElement.parentElement.innerText
|
You can learn more here.
When you have found the correct ‘relative’ element, you can configure a variable within Google Tag Manager a variable named e.g. “CartValue” to pick up the cart value within GTM.
function(){
return google_tag_manager["YOUR OWN GTM-CODE"].dataLayer.get("gtm.element").parentElement.parentElement.innerText}
|
Configure a GTM Tag and Trigger when the shopping cart page is viewed
Now you just need to inject the basket variable into Mouseflow, by adding a Mouseflow Variable.
You can find more articles on how to work with Variables and Tags within Mouseflow on our Help Center.
- Learn how to set up a custom variable using Google Tag Manager
- Tag recordings using Google Tag Manager
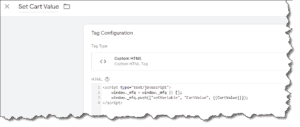
The JavaScript code to inject a variable into Mouseflow is:
<script type="text/javascript">
    window._mfq = window._mfq || [];
    window._mfq.push(["setVariable", "KEY", "VALUE"]);
</script>
Replace the Key with e.g. “CartValue” and the Value with “{{CartValue}}” to collect the GTM variable identified from the first step.
The GTM tag would look like this:
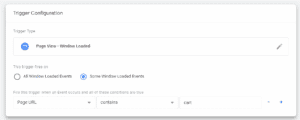
The last step is to connect the GTM-Tag to a Trigger to ensure the information is passed into Mouseflow, when available.
Configure a GTM-Trigger for “Page View – Window Loaded” and select “Some Window Loaded Events”, then enter some or a portion of the Page URL for your basket/cart page:
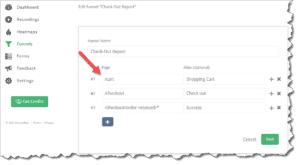
Configure the 'Check out Funnel Report' within Mouseflow
By now, you will have the CartValue injected into every Mouseflow recording, where visitors have been visiting your cart or basket page. Now you can set up a Mouseflow Funnel Report to understand how your visitors are converting or not converting…
The URL’s for the shopping journey in this example are as follows:
- /cart
- /checkout
- /checkout/order-received/*
Create a Mouseflow Funnel Report like this:
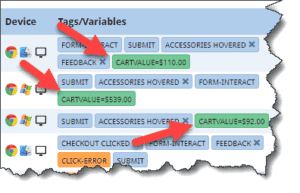
From the Funnel report you can quickly identify the visitors who are dropping after the basket/cart page has been visited:
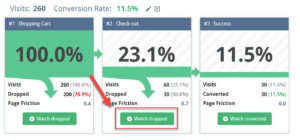
Each of these recorded sessions contains the “missed” cart value as a variable and you can easily export the dataset into a CSV file and calculate this combined value of the missed opportunity. Furthermore, you can review some of these recordings to see if and how visitors are struggling on your website.

To save the dataset as a CSV file, simply click [Unsaved Filter] and select [Download CSV] from the menu.
Other custom tags to help you understand your users' behavior
With this article you learned hot to tag cart value like a pro using GTM. But we need to let you know that most of the elements on your website can be tagged with our no-code, Custom Tags Tool, without even leaving Mouseflow.
Custom Tags help can be used to filter conversion funnels, recordings or heatmaps for you to have a better understanding of the behavior of a specific segment.
Check out some suggestions on some commonly tagged behaviors across different websites in our article “9 behaviors you should tag on your website”.